Behind the Flowers: Part 2
A breakdown of my collaboration with "The Furrow" for animators and motion designers.
When last we spoke, I broke down the design, printed, and AI elements of my EBsynth experiment with “The Furrow”. Today I’d like to get deeper into the nitty gritty animation process, pre printing and pre-AI.
Rough Animation
With some working design frames, I jumped into Animate CC. I wanted to try printing and scanning this sequence later, so I made sure to keep the frame rate low. The initial rough is a mix of 3s and 6s (8 and 4 frames per second respectively).
When handling the flower “rotation,” I used the “transform” tool in Animate CC to narrow the flower shapes as they rotate towards or away from the camera. This is a quick 2D illusion I use often to create a more 3D-like movement.
I then brought the rough layer SWFs into AE (using Battleaxe’s “Timelord” plugin) to control the movement of the vase as a whole in relation to the fingers. This way I could experiment with a more dimensional approach to the vase motion.

We ended up with a nice rough to build on top of. Commence the AE Debauchery.
Clean Up
Shape Layers
As I’ve mentioned, I tried to keep everything as editable as possible. This meant using primarily AE shape layers for clean up, duplicating and masking layers to create the shadows, and nesting the vase and flowers in their own composition. I like shape layers because you can do so many things with them: Animate their shape, re-color them, add effects, create masks, the list goes on.
I traced over the rough by animating the paths of each shape layer, separating shapes into “outline” and “base” layers. This way the shadow layers could live underneath the outlines, but on top of the base layers.
Vase + Flowers
For the vase and flowers, I animated the top flower shapes’ position and scale properties. Then, using “points follow nulls,” (or nulls follow points, I can never remember which is which) I created shape layer paths that could connect to their individual top flowers and the vase. That way the paths could follow the flower motion while remaining fastened to the vase.
Compositing and Effects
With all the shapes and flowers animated, it was time to match the full style. I did this by using photoshop elements from the design file and effects in AE.
Gradient
I often rebuild design layers and gradients in AE using shapes layers and a fast box blur effect. However, this time I used the existing photoshop gradient layer. Since I didn’t need the gradient to move, I could simply mask it to the flowers.
For the flowers, I ended up making each flower it’s own individual composition. I then added a “stroke” overlay to give each flower the outlines I wanted and to make sure the that the overlapping animation was clear.
Hand Drawn Effects
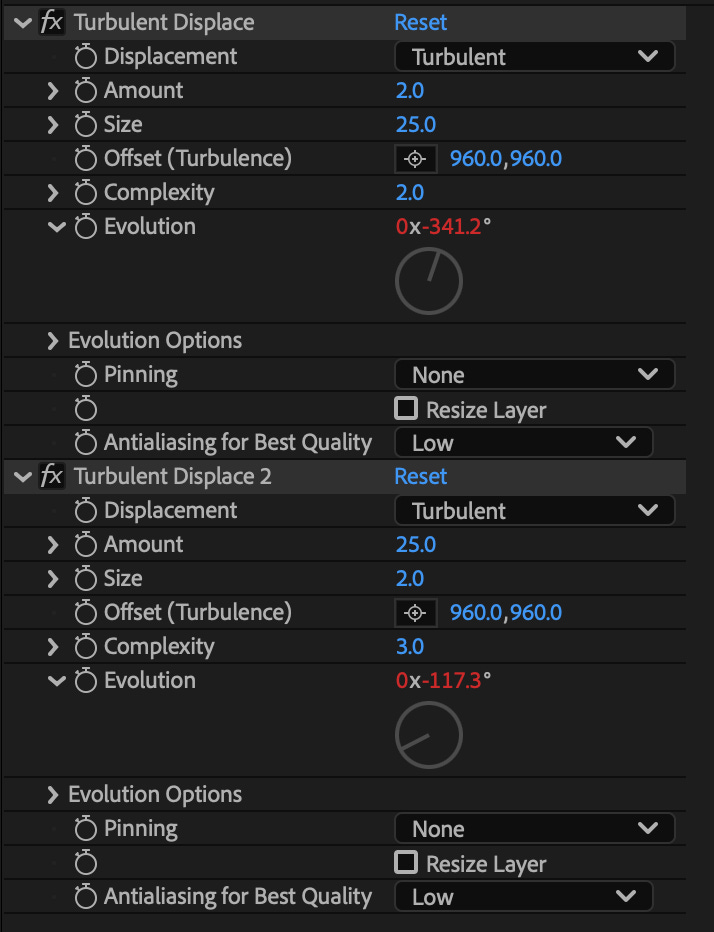
I wanted a hand-drawn line effect here that would mimic the texture of my line work in photoshop. I used a combination of effects that I learned in a Ben Marriott tutorial. Thanks Ben! (Your tutorials have saved me on so many projects.) I go a little further and add a custom script to the evolution properties in the turbulent displace effect.

You can see a subtle boil and variation to the line below. I love how simple this effect it, yet you can really control how your lines feel and move.
Texture
The “Infinite Pulp” texture pack from true grit supply is amazing. I took one of the ir many paper texture options and created an animated overlay to apply to the entire sequence. The animated overlay and the turbulent displace effects combination gives me the hand drawn look I want.
Closing Thoughts
In order to preserve the hand drawn look of my design frame, I had to think economically. If I had cleaned everything up by hand, it would have looked great, but AE clean up can be really fun! And it doesn’t have to look entirely digital. If you’re an animator, I encourage you to find ways of using software to amplify your own ideas, versus having the software dictate what your ideas look like.


